
SSH key login + disable password
Let's move on to the next logical step in setting up security - to replace password login with key login, which we will generate.
After this point, no one will be able to enter the server without a file that will be stored on your computer.
You can skip setting up an SSH key and move on to 2FA security - the login will require a server password and then a six-digit code from Google Authenticator. But you can install both options.
In addition to the security settings on the server, you need to secure your account on the hosting provider's website by connecting 2fa to your personal account. This is necessary because through the personal account console, let's say Vultr, anyone can log into the server even with strong security settings.
Steps to enable SSH keys login
Generation of SSH keys. Move the keys to the right places.
Checking for login.
Disable password login.
Generation of SSH keys.
Choose the guide you need. If your PC is on Windows, go straight to step b) Generation on a Windows PC.
a) Generation on PC with Linux/macOS
Unix has a built-in key generator.
Launch the terminal and enter:
ssh-keygenIt will be possible to set a password for SSH keys. This will additionally protect you from possible key theft. The main thing is to write down the password in a safe place. If you do not want to set a password, press Enter.
Done, the keys are created and stored in the folder ~/.ssh/
~/.ssh/id_rsa - private key. We should leave it on PC.
~/.ssh/id_rsa.pub - public key. Must be on the server.
Uploading the public key to the server
Of course, you can copy all the text from id_rsa.pub and paste it on the server, as is done on Windows:
Let's go to the server, create and configure the repository and file (enter one by one):
Now we copy the entire public key from the id_rsa.pub file to the clipboard.
Next, enter the command on the server
After that, paste the copied key text by pressing shift + insert and complete the input process by ctrl+D.
But on Unix systems this can be done more easily than on Windows. To do this, open a terminal on PC and enter the command:
Where:
root - the user we want to access the server using ssh keys.
ххх.ххх.ххх.ххх - server ip address.
If you want to specify the path to the public key that needs to be moved to the server. As well as the ssh port of the server:
Ready. You can proceed to the next step - Checking the login using the SSH key.
б) Generation keys on Windows PC
We need 3 programs:
1) In the “Type of key to generate” column, select SSH-2 RSA (exactly this type. If not in the main window, then select “Key” in the top menu) 2048.

2) Now click Generate.
3) In order for the key to be generated, you need to move the mouse across the screen.
4) We save the private key on the PC. To do this, click the Save private key button.
Uploading the public key to the server
1. Let's go to the server, create and configure the directory with the file (enter in turn):
2. Now copy all the text from the public key file to the clipboard, or as shown in the picture:

3. Next, enter the command on the server
After that, paste the copied text by pressing shift+insert and complete the input process with ctrl+D.

Ready. The public key is inserted into the file.
Checking for login with SSH keys.
We will not only check, but also save the session for further convenient work.
1) On the session tab, insert the IP and port:

2) Go to the Connection --> SSH --> Auth section and write the path to the private key that we created and placed in the folder we need:

3)Go back to the Session section --> Come up with a name for the session --> Save the session --> And go into it.

If everything worked out successfully, the last step left for us is to disable password entry.
Disabling password login.
Make sure that the key is securely stored and you will not lose it, because you will no longer log in with the password (only through the console in the provider's personal account, or through VNS).
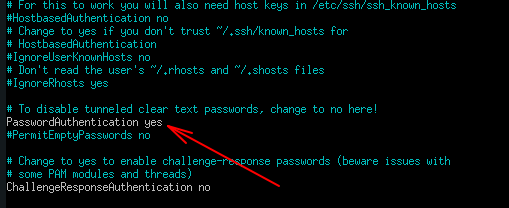
Log in to the server, then open the configuration file for editing /etc/ssh/sshd_config :
Find the line there PasswordAuthenticatin yes. You need to set its value to No:
Let's restart the service:
Everything is ready!🎉
Last updated